Wednesday 29 April 2015

> PINTEREST AND OTHER SOCIALITIES

Tears of the Goddess -
garnet and labradorite

Boy, does my internet annoy me! The one time I was feeling productive and tried to get my post done in time, I'm sabotaged by my internet connection. Bah!


Sheherazade - Smoky quartz
heart pendant and chain
In this issue, I'd like to promote my Pinterest board a little. :)


For those of you who need a quick, concise summary of what I offer, my Pinterest board is your place to go. All of my items that are currently for sale plus a few of the ones already sold are on display there, linked to either one of my shops for your convenience, and all on one board where you can scroll your way through. ;)

As I already mentioned in my Endless Possibilities post about earrings, that kind of jewelry is featured the most in my current collection. 9 versions of earhooks, 23 different earring designs, 3 chandeliers, 4 hoops and 8 pearl earrings are currently available.

Next are the necklaces, all in all 15 different styles, including one choker and one 2-1 double-strand collier (each strand can be worn individually).


Thorns - Wire wrapped
baroque pearls
A Meeting of Fays -
Size-adjustable statement
ring with carnelian and crystal

9 bracelets, 3 cuffs/bangles and 2 pearl cuffs are also featured, including a very bold style made from wire and baroque pearls.
Circle of Fate - Onx and
carnelian pendant

Among the 9 rings are two very interesting pieces. Both are wired to a size-adjustable ring shank and are statement designs. One is studded with a number of amethyst briolettes, and the other is a broad design with silver ivy leaves and carnelian and crystal briolettes.

Then, we have a very small number of charms and pendants, which really need to be updated.

Last but not least there is my one LARP or CosPlay piece, a scalemail necklace in green and gold. 

So go on and have a look, or, if you don't fancy Pinterest, you could also go and visit my facebook site. :) Every drop of love is very much apprechiated! 


> PINTEREST UND ANDERES

Meine Güte, geht mir mein Internet auf die Nerven. Da ist man mal motiviert, kreativ und möchte seinen Post rechtzeitig in die Welt hinausschießen, und dann sabotiert einen sein eigenes Internet. Man!

In dieser Ausgabe möchte ich mein Pinterest-Board etwas bewerben. :)

Für diejenigen unter euch, die sich nicht erst durch die Seiten meiner Shops klicken möchten sondern eine kurze, präzise Zusammenfassung der Sachen brauchen, die ich anbiete, ist mein Pinterest-Board der richtige Platz. Alle Stücke, die momentan im Verkauf sind plus einige, die bereits verkauft sind, findet ihr auf einem Board, zum durchscrollen und bereits bequem zu einem meiner Shops verlinkt ;).

Wie ich bereits in meinem Endless Possibilities post erwähnt habe, ist der Großteil meiner Kollektion Ohrringe. 9 verschiedene Ohrhaken, 23 normale Ohrring-Designs, 3 chandeliers, 4 Creolen und Hoops und 8 Perlenohrringe sind momentan dabei.

Bei den Ketten habe ich insgesamt 15 verschiedene Modelle, davon einen Choker und ein doppelreihiges 2-in-1-Collier, bei dem man jede Reihe einzeln tragen kann.

9 Armbänder, 3 Armreife und 2 Perlenarmreife sind auch dabei, inclusive eines sehr auffälligen Designs aus drahtgebundenen Barockperlen.

Bei den 9 Ringen sind zwei sehr interessante Designs dabei. Beide sind mit Draht auf größenverstellbaren Ringschienen befestigt. Der eine besteht aus facettierten Amethysttropfen, und der andere hat silberne Efeublätter und facettierte Tropfen aus Karneol und Bergkristall in der Mitte.

Dann gibt es noch eine sehr kleine Anzahl an Charms und Anhängern, die ich echt mal aktualisieren muss. Und zu guter Letzt mein momentan einziges CosPlay oder LARP-Teil, eine ScaleMail-Kette aus goldenen und grünen Schuppen.

Also auf, schaut mal rein, und wer Pinterest nicht mag, kann gern auch alternativ meine Facebook-Seite besuchen. :) Ich freue mich sehr über jeden Besucher und Kommentar! 


Monday 27 April 2015

> CHARMS REVISITED

Charms again! :) Not (just) because I like them so much, but also because a friend said that it would be good to visualize their use a bit. Which is good, because I found three extra charms in my handbag that fell out of their box (my daughter played with it, and apparently she managed to make a hole ...) and therefore didn't make it into my charms post. So here is their chance to gain fame. :D

Cool colors on necklace charm holder
Warm colors on white leather bracelet
The simplest way to wear a charms bracelet is to use a chain bracelet with big enough links to hook your charms into. Because I mainly use small-linked chains, I cannot depict that here. However, I'm sure you can easily visualize this yourself. Another possibility is to use charm holders. Those elements for bracelets are small tubes with a ring attached. For necklaces, they usually consist of a bigger, slightly decorative element, also with a smaller ring attached to fasten the charms. 


Snow White and Rose Red
Strong greens, brown and black
on necklace charm holder

I grouped the charms into color themed sets of four, of course you can use more or less, depending on your taste. The first group consists of blue charms (hawk's eye and hemimorphite), turquoise (amazonite) and violet (amethyst), and the charms are attached to a necklace charm holder. The second image is a visualisation of a white leather bracelet with warm colors, charms of red (carnelian), gold (Himalayan golden shell and tiger eye) and brown (smoky quartz). Third, we have a red leather bracelet with white (druzy crystal, clear crystal and tourmalated quartz) and light rose (rose quartz) charms. The last is a 
group of greens (serpentine), brown (smoky quartz) and black (spinel) as necklace pendant. As you can see, it's sometimes interesting and appealing to combine smaller and larger charms. The jewelry piece becomes more harmonious, however, if you group your charms not only according to color matches but also according to size.


> CHARMS DIE 2.

Schon wieder Charms. :) Nicht (nur) weil ich sie echt mag, auch weil eine Freundin meinte, dass es vielleicht gut sei, sie mal als Anhänger an einem Schmuckstück zu zeigen. Eigentlich trifft sich das ganz gut, da ich kürzlich noch drei extra Charms in meiner Handtasche gefunden habe, die sich anscheinend selbstständig gemacht haben (meine Tochter hat mit der Charms-Box gespielt ... und es anscheinend geschafft, ein Loch reinzumachen). Deswegen haben die armen drei es nicht in meinen Charms-Post geschafft. Das hier ist also ihre Chance auf Weltruhm. ;) 

Die einfachste Art, ein Bettelarmband oder Charms-Armband zu tragen, ist ein Kettenarmband zu nehmen, dessen Glieder groß genug sind, um die Charms einzuhaken. Da ich meist nur kleingliedrige Ketten verwende, kann ich das leider nicht darstellen. Aber ich bin sicher, dass ihr euch das gut vorstellen könnt. :) Eine andere Möglichkeit ist, einen Charms-Halter zu benutzen. Für Armreife bestehen die kleinen Teile oft aus einer Röhre mit einem Ring an der langen Seite. Bei Ketten ist ein Charms-Halter meist ein etwas größeres Element mit einem angeschweißten Ring, das nur leicht dekorativ ist, um den Charms nicht die Show zu stehlen. 

Ich habe die Charms in farblich abgestimmte Vierer-Gruppen gegliedert. Natürlich kann man je nach Geschmack mehr oder weniger nehmen. Die erste Gruppe hat kalte Farben, blau (Falkenauge und Hemimorphit), türkis (Amazonit) und violet (Amethyst), und die Charms hängen an einem Ketten-Charmhalter. Das zweite Bild ist eine Veranschaulichung eines weißen Lederarmbandes mit warmen Farben, rot (Karneol), gold (Himalaya Goldmuschel und Tigerauge) und braun (Rauchquarz). Drittens haben wir ein rotes Lederarmband mit weißen (kristalliner und klarer Bergkristall und Turmalinquarz) und hellrosa (Rosenquarz) Charms. Das letzte Bild zeigt eine Gruppe aus grünen (Serpentin), einem braunen (Rauchquarz) und einem schwarzen (Spinell) Charm. 
Wie ihr sehen könnt, kann es ganz reizvoll sein, Charms verschiedener Größen zusammenzunehmen. Um ein harmonischeres Bild zu erzielen, ist es aber besser, wenn man die Charms nicht nur nach Farbe, sondern auch nach Größe zusammenstellt.


Sunday 26 April 2015

> SIMPLE YET EYECATHING

Yes. I know. The translations are still not finished. Why? Because I'm lazy. And because I gave in to my weakness again and had a gaming date with The Elder Scrolls. So sue me. ;)

Anyway, what I made in between gaming sessions this weekend was a different version of my Cat's Eyes bangle. The design is shockingly simple, but depending on the gemstones you use, the bangle becomes a real eye catcher. This weekend, I did it with completely clear crystal beads, engraved with a  

silver phoenix. The wire frame is a lightweight design by nature, but by adding the gemstone beads the bangle becomes nicely heavy and settles itself well on the wrist. It stays in place quite well, too, so it doesn't bother you doing desk work, for example. 

Imagine this bangle with a stronger color ... like the Himalayan golden shell or the faceted carnelian beads I mentioned in my charms post a little over a week ago. I'm sure this bangle would look fantastic with a simple black or white cocktail dress, regardless of the gemstone color. 


> EINFACH ABER OHO

Ja, ich weiß. Die Übersetzungen sind immer noch nicht fertig. Warum? Weil ich faul bin. Und weil ich mal wieder meiner Schwäche nachgegeben habe und ein Gaming Date mit The Elder Scrolls hatte. 

Zumindest aber hab ich am Wochenende, zwischen den Spielsessions, eine zweite Version meines Katzenaugen-Armreifes gemacht. Das Design an sich ist erschreckend einfach, aber abhängig von den Edelsteinen, die man einsetzt, wird es zum echten Blickfang.

Dieses mal habe ich den Armreif mit völlig transparenten Bergkristallen gemacht, die mit einem silbernen Phoenix graviert sind. Das Drahtgestell ist von Natur aus ein sehr leichtes Design, aber durch die Edelsteine wird es angenehm schwer und schmiegt sich gut ans Handgelenk an. Es liegt auch so, dass es sich wenig bewegt, also stört es nicht wenn man beispielsweise Schreibtischarbeit macht.

Stellt euch den Armreif mit einer kräftigeren Farbe vor ... vielleicht die Himalaya Goldmuschel oder die facettierten Karneole, die ich bereits in meinem Charms Post vor etwas über einer Woche erwähnt habe. Ich bin mir sicher, dass dieser Armreif fantastisch zu einem einfachen schwarzen oder weißen Cocktailkleid aussehen würde, egal welchen Edelstein man verwendet hat.

Saturday 25 April 2015

> LOST IN TRANSLATION


Hurray! I managed to translate about half of my posts to German. Sorry for not posting yesterday, I promise it won't happen again. I just couldn't find the time to both translate the old ones and compose a new post. :)

Tomorrow, you'll get a completely new post, AND all of the existing ones will be translated! Including nice Buttons to switch between English and German ... which should work ... in theory. I re-activated my HTML knowledge, and the code for the links and the anchors are correct. The problem, in fact, is blogger. Somehow, it automatically changes the links after a time so that they don't read <a href="#link-to-anchor"></a> anymore, but more like <a href="https:\\www.blogger.com/whateverIreallydontgetit........#link-to-anchor"></a>. If someone, anyone can tell me how I have to code so that this doesn't happen, PLEASE tell me. dreampaths.schmuck (at) gmail.com. I'll be eternally grateful!

See ya tomorrow! :)


Hurra! Ich hab's tatsächlich geschafft, etwa die Hälfte meiner Posts ins Deutsche zu übersetzen. Sorry für den fehlenden Post gestern, ich hab's einfach nicht auf die Reihe gekriegt, sowohl meine alten Posts zu übersetzen als auch einen neuen aufzusetzen. :)

Morgen bekommt ihr einen völlig neuen Post UND die Übersetzung von allen alten! Inklusive schöner Buttons zum Wechseln zwischen Englisch und Deutsch ... die im Grunde funktionieren sollten ... theoretisch. Ich habe mal mein uraltes HTML-Wissen wieder ausgegraben, und der Code für die Links und die Anker sind eigentlich richtig. Das Problem hier ist tatsächlich blogger. Irgendwie ändert es automatisch die Links nach einer gewissen Zeit, so dass sie anstatt so <a href="#link-to-anchor"></a> vielmehr so <a href="https:\\www.blogger.com/wasauchimmerichverstehseinfachnet.......#link-to-anchor"></a> aussehen. Wenn mir irgendjemand sagen kann, wie ich den Code schreiben muss, damit das nicht mehr passiert, BITTE schreibt mir. dreampaths.schmuck (at) gmail.com. Ich werde ewig dankbar sein! 

Bis morgen! :)

Thursday 23 April 2015

> WIRE WONDERS: FLEXIBLE BRACELET WITHOUT ELASTIC CORD

First off, quick reminder: THE CONTEST IS STILL ON, PEOPLE! :)

That said, I'd like to talk about my favourite medium today: wire. 
In general, when you hear the word 'wire', I bet your mind conjurs up something strong, an inflexible and sturdy construct, wire links or maybe a stone firmly embedded within its wire bezel. All that is correct.

But!

Normally, when you need a wire link to connect two or more pieces of your project to shape the whole, the talk is about small pieces of wire, maybe funnily and intricately shaped. Those single pieces are quite strong and don't give much when pulled on from either direction, because of their size. But imagine the same link design, over and over, shaped from a single piece of wire. When you pull on the resulting wire chain, the links give. Not overmuch, ideally, but they do. 

Athena chain links forming a flexible wire cuff.
An easy way to achieve (more or less ;)) evenly spaced and formed loops, bends and twists with wire is to use a jig. Those usually consist of a block of plastic or metal with holes drilled into in a specific pattern. You put metal pegs into those holes and shape your wire around them.


The shape I chose for my Snowflake bracelet is called the Athena Link, because the most perfect form of it can be achieved on the WigJig Athena. It's a smaller jig, with holes arranged in an arrowhead pattern.

You can either add beads into the design while shaping it, making them sit directly on the link, or you can add the beads as dangling charms to the finished loops. I like it when a piece of jewelry keeps moving (only when intended to do so, of course) and jiggling, and the white pearls add a certain softness to the piece.

To close the cuff, you could either try to connect the first and last links somehow permanently, the cuff is flexible after all, or you can simply add a clasp in the same style or shape the first and last links as such.

Have a look round my shops for this and more wire inspirations.

Happy wire shaping! :)

Wednesday 22 April 2015

> CHAINMAIL RAINBOW

Simple chainmail earrings with colored
anodized aluminum rings and
rainbow moonstone discs.
Okay, I admit it. The chain-/scalemail wave has caught me up, too. You might have already noticed. ;)

I thought I'd try some easy projects at first. The first (and at the moment, only) project just with jump rings was, surprise, a pair of earrings. :) I opted for the colorful anodized rings instead of just aluminum, and decided to make some rainbow jewelry. The design is really really basic. Aluminum rings connected by two pairs of colored rings per row. The result was okay, but I thought something was missing, so I tried to add some gemstones to it. I chose rainbow moonstone discs and wired them into the aluminum rings so that they looked like they were floating. 

The only problem with this design is ... the discs don't stay where they are supposed to be. Clearly, some adjustment has to be done. Sometime, when I'm in the mood, I'll get to it. But until then, I think I can enjoy them as they are. They are not perfect, but totally wearable, and somehow, I like them all the more for it. :D


Tuesday 21 April 2015

> EARRINGS: ENDLESS POSSIBILITIES


When working as a jewelry artist, the possibilities in designing a new piece of jewelry are almost endless. At least in theory. In practice, they are usually limited by the availability of materials, sometimes by the wishes of a customer, and of course by the skill of the designer. ;) 

Amethyst briolettes with
wire wrapped bail
Same basic design, but with
carnelian briolettes and bead
caps
A pair of earrings, however, is the one kind of jewelry that doesn't pose much of a challenge even for a beginner. Of course, there are many extraordinarily elaborate earring designs on the market, from donut jewelry and artfully wire wrapped and hammered designs to soldered, punched and cold-fused pieces and fancyful and fantastic ear cuffs. To just mention a few. But the basic design, a hook and a bauble, can be done with very limited materials and skills.

Since there is so much to say about earrings, and also in answer to ichselbst's comment to yesterday's contest post (THE CONTEST IS STILL ON, PEOPLE!), have a look at (just a few of) the possibilities of earring designs. If you know the answer to the contest, mail me, and you get chose from one of the designs. Or just tell me what you'd like and get a completely new and totally customized pair of earrings for your trouble. :)

Personally, I love making earrings. I always have to hold myself back so as to not overcrowd the earrings section in my shop and neglect the others.
Wire wrapped open hoops with
citrine chips. Can be done with
all kinds of gemstone chips.
Also a very early design. Deep
black and faceted obsidian
beads adorned with a silver
leafy bead cap and a seed bead.
One of the very first designs I made were simple chain earrings with briolettes. I chose amethyst briolettes, cut a chain in two different lengths, created a (not very artful, but very creative ;)) wire wrapped bail for the briolettes to attach them to the wire, added hooks, and the first in a long line of chain earrings was finished.

Other kinds of earrings that I've experimented with include wire wrapped designs. 

There are designs where the wire takes the center stage and the gemstones are just an embellishment. The citrine and tourmaline hoop earrings are examples of that. 

Then, you have wire wrapped donut earrings. You can always attach donuts to readymade donut holders and wear them as pendant or earring, but they don't look half as interesting as a donut in a 
wire wrapped 'cage'. 
Of course, the wire versions can't be detached from one donut and re-attached to another, but they are much more fun to look at.
Most elaborate and most
recent design as of yet.
Wire wrapped sodalite
donuts.
Same basic design as the citrine
hoops, just bigger and with black
and red tourmaline discs.
Two other forms is the wire ear hook and the freeform wire design. Earhooks are quick to make and very versatile, you just need chips of a variety of gemstones. The freeform design is fun to make, but can also be tricky because it's, well, ... freeform. :D Not everything turns and bends just the way you imagined it.
Playful design, twisted strands of
wire, knotted around a big jump
ring, with ruby, emerald and
sapphire discs attached,
accentuated by crystal briolettes.

Below, you can see other examples of earring designs. Almost all of them, and many others, can be found in my shops, so don't hesistate and browse a little. :) 


Long fancyful shoulder dusters.
Two frosted and one clear
faceted smoky quartz bead atop
a long and pointy bead cap with
added chain fringes.
Wire ear hooks, adorned with
green peridot chips.
Elaborate chandelier design with
petrified wood and sterling silver
beads.
Red tourmaline chandelier
earrings, connected with chains.

Marriage between fluorite cubes
and seed bead tubes. Design is
very versatile.
Chain earrings with acoya pearls and three different lengths.
Cute thick tiger eye discs wrapped
in a freeform copper wire
conglomerate.
Simplest but nevertheless elegant
way to do briolette earrings,
just wrap up the bead,
attach to hooks, finished.
Heavy (also because they swing
a lot on the ear) earrings made
from onyx circle, smoky quartz
and engraved rock crystal.
And yet another version of the
simple chain earring design, this
time with three lengths of chain and
acoya pearls.
Cute small tiger eye chandeliers,
connected with wire and chains.
Simple double-bead chain
earrings.

Monday 20 April 2015

> CONTEST: WHY YOU SHOULD NEVER WORK BY DIMMED LIGHT

Riiiiight. The first one who can spot the problem in the project below wins a free pair of custom made earrings.

A while ago, I started my first two scalemail projects, a necklace and a bracelet. Since the necklace was crafted with bigger scales and jump rings and was therefore easier to work with, I put the smaller bracelet on hold.
Then, one evening, I decided that I wanted to finish the bracelet. I worked on the sofa, with dimmed light because I also had a cold and bright light hurt my eyes. To make me even more comfy, I worked while watching The Flash on TV.

 
Right side of the bracelet. :)
Left side of the bracelet. 
It all went pretty well, no weaving problems whatsoever, and I was quite pleased with the result. Until I saw the piece by natural light the next morning. :D

Can you spot the mistake? :) E-Mail me, dreampaths.schmuck (at) gmail.com.


Sunday 19 April 2015

> NEW GEMMIES!

Rhodochrosite, faceted Labradorite
and a faceted citrine nugget
New gemmies have arrived! Hoooray! :D

I am always super happy when a new shipment of stones arrives. I'm almost like my daughter when she's allowed to help with something new, like stirring up the glue for a papier mâché project - literally shivering with excitement. 

Unpacking the stones and seeing them for real for the first time and not just pictures on the net, feeling their texture and seeing them change their hue when the light is altered, I could spend hours sorting them into my stash and comparing the newcomers with the oldies. 


The first of today's new kids on the block is a nice big cabochon of pinkish rhodochrosite, beautifully polished and drilled through one end. It will probably become the focal bead of a multistrand bracelet. :) Next in line is a faceted freeform piece of labradorite, with a truly beautiful color change and slightly see-through if held into the light. It doesn't have a designated project as of yet, so requests and ideas are always welcome. :) Third is an undrilled, faceted citrine nugget, topside whitish and gradually getting strongly honey-colored at the tip. It will definitely end up as a pendant. Fourth and last is a rectangular faceted grossular bead (green garnet), drilled lengthwise. It's not featured on the pic because it is already busy being made into the center piece of a wire flower pendant ... although it keeps resisting. ;)

If any of the stones strikes your fancy and you decide that they'd look great as newest addition in your jewelry box, drop me a message. I'm sure transfer of adoption rights can be arranged somehow. ;)

Saturday 18 April 2015

> WIRE ON THE NEEDLE


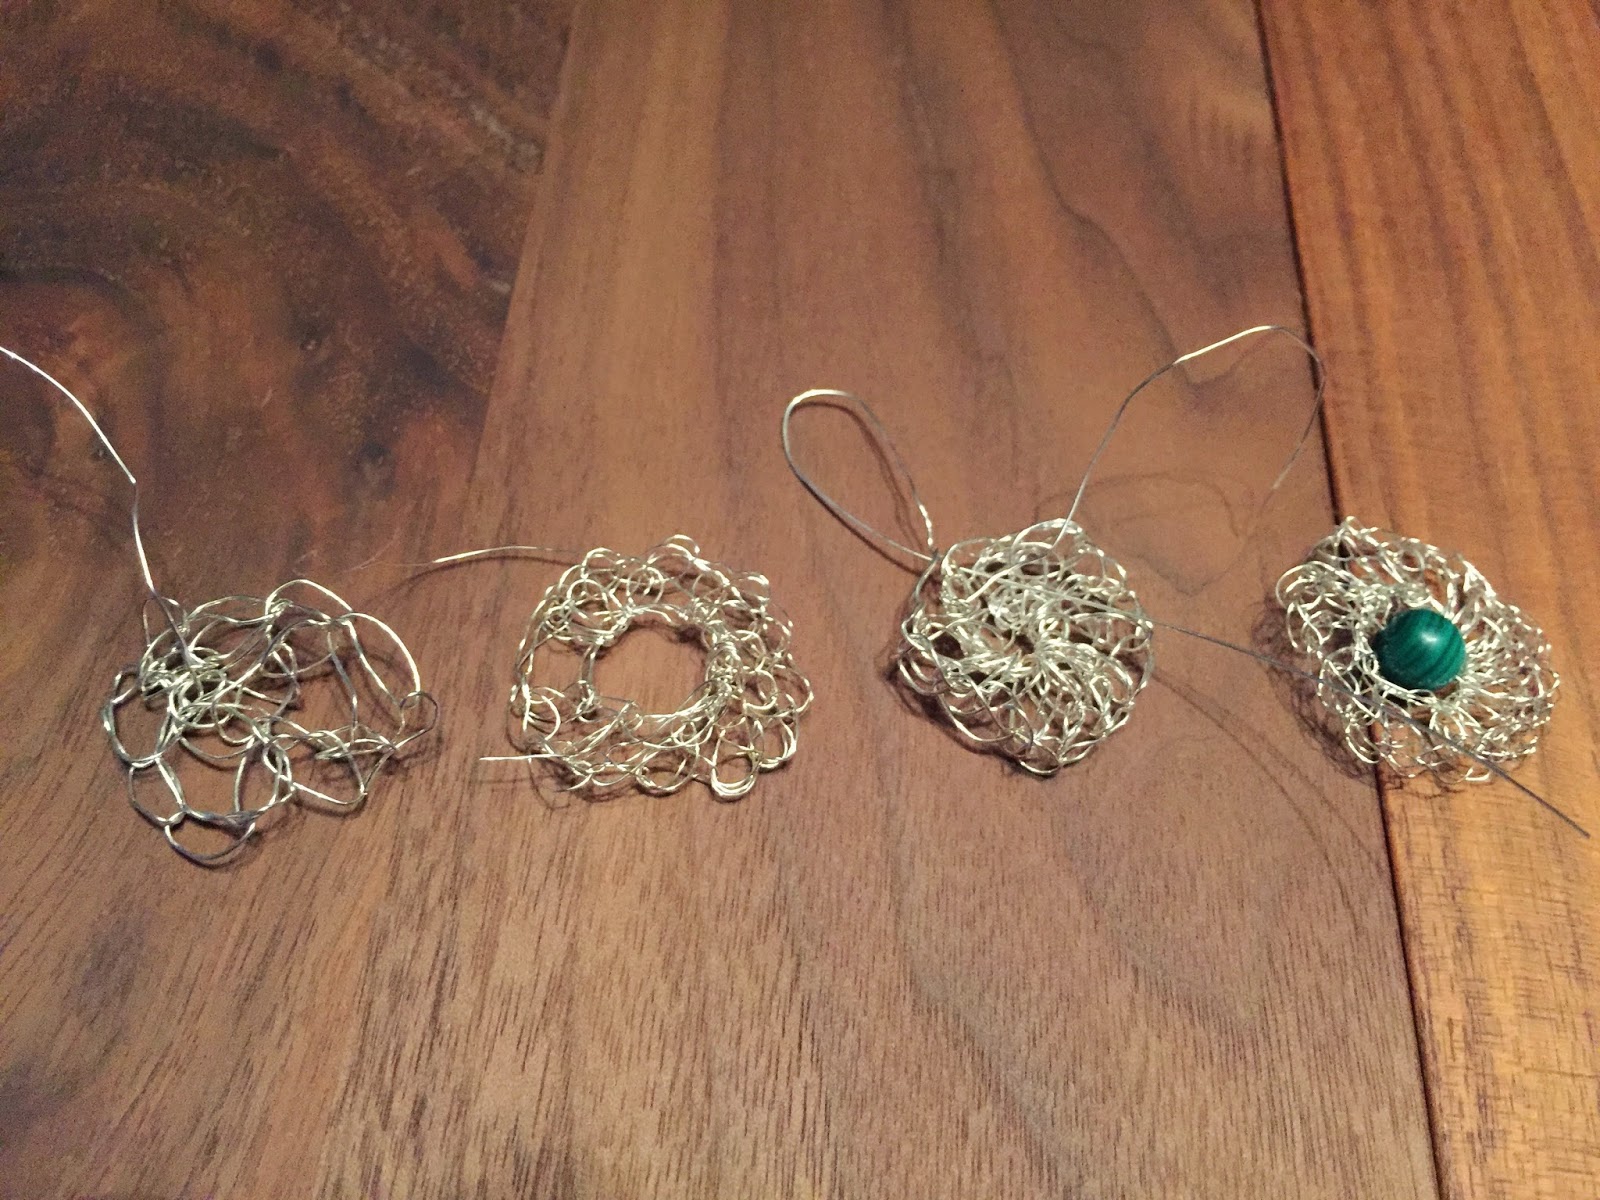
A while ago, a very good friend posed the question if I had any ideas to do a cross-crafting-project. She's talented in a variety of crafts, absolutely loves to knit, can sew pretty well and has recently learned to crochet. 

She asked me whether I had ever tried to crochet with wire, but since I'm rubbish at both crocheting and knitting, I could only shake my head emphatically. So just like that, it was decided that our first joint venture would be a wire crochet jewelry piece embellished with gemstones. 


It was quite funny actually. Above, you see the progress of Seulme's work. Piece 1 and 3 are made with 26 gauge wire, piece 2 and 4 from 28 gauge wire. It only took her four tries to get the hang of wire crocheting, which is pretty cool, if you ask me. The plan was to produce a pair of matching earrings, but to accomplish that, we'd have needed two crochet flowers that ... well ... matched. :D In the end, we decided we'd be better off fashioning the existing, good-looking wire flower as a pendant. So I added a round malachite bead, and voilá, the base of a brand-new piece of jewelry was finished. 

I really like joint venture projects where you basically don't have to do anything and just jump in at the last second to add the finishing touch. :D

Stay tuned for further interesting developments in the cross-crafting area! :)


Vor einiger Zeit hat mich eine sehr gute Freundin gefragt, ob wir denn mal ein, quasi, handwerksübergreifendes Projekt machen wollten. Sie hat viel Talent bei einer Reihe von Kunsthandwerken, sie liebt Stricken, kann ziemlich gut nähen und hat sich kürzlich das Häkeln beigebracht.

Sie hat mich gefragt, ob ich je versucht hätte, mit Draht zu häkeln, und da ich eine absolute Niete im Stricken und im Häkeln bin, konnte ich leider nur stumm den Kopf schütteln. Und schwupps, war es entschieden, dass unser erstes gemeinsames Projekt ein aus Draht gehäkeltes und mit Edelsteinen verziertes Schmuckteil werden sollte.

Es war echt recht lustig. Im Bild seht ihr den Fortschritt in Seulmes Versuchen. Teil 1 und 3 wurde mit 0,4mm Draht gehäkelt, Teil 2 und 4 mit 0,2mm Draht. Sie hat nur vier Versuche gebraucht, um rauszukriegen, wie man mit dem Draht beim Häkeln umgehen muss, was ziemlich cool ist, wenn ihr mich fragt. Der Plan war eigentlich, zwei gleiche Teile zu produzieren, um ein Paar Ohrringe herzustellen. Allerdings bräuchte man dafür halt ... na ja ... zwei GLEICHE Teile. :D Schlussendlich haben wir uns darauf geeinigt, aus dem einen, gut aussehenden Teil einfach einen Blumenanhänger zu machen. Ich hab also eine kleine Malachitkugel eingefügt, und voilá, das Grundgerüst für ein brandneues Schmuckteil war fertig.

Es ist echt cool, bei Gemeinschaftsprojekten mitzumachen, wo man im Grunde nix machen muss und dann nur in der letzten Sekunde einspringt und den letzten Schliff hinzuzufügen. :D

Bleibt am Ball für weitere interessante Berichte über unsere Joint-Venture-Projekte. :)

Friday 17 April 2015

> CHARMED, I'M SURE


Charms. Which woman doesn't have them in her jewelry box? Small cute pendants, de- and retachable, making it possible to adjust one and the same necklace or bracelet for every occasion.

Since gemstones come in so many hues and can be cut in so many different shapes, I think they are predestined to be made into charms, expecially if you love a little color splash on your jewelry piece among all that silver (or gold ... or copper ... or or or). 

They are really easy and quick to craft, and while re-watching some episodes of Doctor Who one evening, I managed to make a nice handful of them.

From top left to bottom right: flat faceted crystal, druzy crystal, faceted tourmalated quartz, himalayan golden shell, rose quartz, faceted carnelian, flat hemimorphite disc, oblong amazonite, carved (rose shaped) amethyst, thick tiger eye disc, faceted round smoky quartz, faceted oblong smoky quartz, hawk's eye.

As always, you can come to me with any special wish or need you might have, and I'll do what I can to accomodate you. :) I also have lots more different kinds of stones in my stash, so just message me should you look for a special one.


Charms. Welche Frau hat sie nicht in ihrem Schmuckkästchen? Kleine, süße Anhängerchen, zum Abnehmen und Hinzufügen, sodass man ein und das selbe Schmuckstück für verschiedene Anlässe passend machen kann. 

Da Edelsteine so viele verschiedene Farben haben können und es sie in so vielen unterschiedlichen Schliffen gibt, sind sie quasi prädestiniert dafür, als Charms verwendet zu werden, besonders wenn man den kleinen Farbklecks zwischen all dem Silber (oder Gold ... oder Kupfer ... oder oder oder) zu schätzen weiß.


Sie sind wirklich leicht und schnell herzustellen, und als ich neulich ein paar Folgen von Doctor Who nochmal angesehen habe, konnte ich nebenbei eine hübsche Handvoll davon machen. 


Von links oben nach rechts unten/mittig: 
dicke Bergkristall-Scheibe, Bergkristall rund mit Rohkristallen, facettierter Turmalinquartz, Goldmuschel, Rosenquarz, Karneol, flache Hemimorphit-Scheibe, länglicher Amazonit, geschnitzte Amethyst-Rose, dicke Tigeraugenscheibe, facettierter runder Rauchquarz, länglicher facettierter Rauchquarz, Falkenauge.

Wie immer könnt ihr mich anschreiben, wenn ihr einen ganz speziellen Edelstein oder eine ganz spezielle Farbschattierung sucht, und ich werde tun was ich kann. :) Ich habe noch viele andere Steine in meinem Vorrat.

Thursday 16 April 2015

> WITCHCRAFT


 Yes, you read correctly. Today's blog is about witchcraft. :)
Or, more specifically, about one of the supposedly most powerful protective symbols there is, the pentagram. 

Its earliest use was as a glyph in cuneiform, meaning "corner", "angle", "nook", "crevice". Later on, the Pythagoreans used it as a sign of recognition, and for them it meant "health".

In early christian usage, the pentagram symbolized the five senses (mind, smell, taste, hearing and touch), or the five wounds of christ. It gained its magical connotation only through Heinrich Cornelius Agrippa, who attributed one of the five neoplatonic elements to each corner. Later, occultists also distinguished between one corner pointing up, which meant victory of spirit over the other four elements and was therefore good. This is also visualized by overlaying the pentagram with a man, with his head as the spirit corner pointing upwards, and his arms and legs as the other four corners, the matter. The other display possibility was the pentagram with two corners pointing up, which symbolized the head of a goat, an often used Symbol of the devil, and meant victory of matter over spirit, which was bad or even evil. As Agrippa put it, "it is the goat of lust attacking the heavens with its horns."

Personally, I absolutely love pentagrams. :) Probably just because they have that not-quite-clear-reputation. I chose to incorporate them into my jewelry designs, and the gemstone pendants you see is the result. 


The pic is wrong side up, something went haywire during upload and I just can't figure out what. o_O Anyway, as you can see, the stones clearly are the central pieces of the design, and the delicate wires crossing in-between the beads depict the pentagram. 

This is the perfect not-so-ordinary gift, and a powerful protection symbol on top. Should you wish a different colour or size, just message me, I'm sure we can figure something out. :) 


Jup, ihr habt richtig gelesen. Der heutige Blog geht um Hexenwerk. :)
Oder, genauer gesagt, um das wahrscheinlich mächtigste Schutzsymbol, das es gibt: das Pentagramm.

In seiner frühesten Verwendung war es ein Bildzeichen in Keilschrift, welches "Ecke", "Winkel", "Nische" oder "Spalte" bedeutete. Später haben es dann die Pythagoräer als Erkennungszeichen verwendet, und für sie bedeutete es "Gesundheit". 

In seiner frühen Christlichen Verwendung symbolisierte das Pentagramm die fünf Sinne (Geist, Geruch, Tastsinn, Geschmack und Gehör), oder die fünf Wunden von Jesus. Seine magische Bedeutung hat es erst durch Heinrich Cornelius Agrippa erlangt, der die fünf neoplatonischen Elemente den fünf Strahlen des Pentagramms zuordnete. Später haben Okkultisten zusätzlich noch Unterschiede bei der Ausrichtung gemacht. Ein Strahl nach oben bedeutete Sieg des Geistes über das Fleisch und war demnach gut. Man konnte auch die Silhouette eines Mannes über das Pentagramm legen, demnach war sein Kopf gleichbedeutend mit Geist, und seine Gliedmaßen symbolisierten die restlichen, fleischlichen Sinne. Zwei Strahlen nach oben symbolisierten den Kopf einer Ziege, ein gemeinhin übliches Symbol des Teufels, und bedeuteten Sieg des Fleisches über den Geist, was logischerweise als sehr negativ oder sogar teuflisch angesehen wurde. Agrippa formulierte es ungefähr so: "es ist die Ziege der Lust, die den Himmel mit ihren Hörnern angreift." 

Ich persönlich liebe Pentagramme. :) Wahrscheinlich gerade weil sie diese etwas ... unseriöse Reputation haben. Ich wollte sie unbedingt in meinen Schmuck mit einfließen lassen, und die Edelsteinanhänger auf den Fotos ist das Ergebnis. 

Das eine Bild ist verkehrt herum, irgendwas ist beim Upload schiefgelaufen und ich weiß einfach nicht, was. o_O Egal. Wie ihr sehen könnt, sind die Edelsteine das Hauptelement des Designs, und die dünnen Drähte, die sie zusammenhalten und sich in der Mitte überkreuzen bilden das Pentagramm. 

Es ist das perfekte nicht-ganz-gewöhnliche Geschenk, und ein machtvolles Schutzsymbol noch dazu. Wenn ihr eine andere Farbe oder Größe brauchen solltet, schreibt mir eine Nachricht, ich bin mir sicher, dass wir was Passendes finden. :)  

Wednesday 15 April 2015

> CUSTOMIZE ME!


Shinigami - Tiger Eye Choker
Today, I'd like to show you a custom order adapted from one of my necklaces. 

On the left is the original piece, Shinigami, a beaded choker made from tiger eye cubes, drilled diagonally, and faceted round beads. The choker is woven in cross-stitch technique, which is pretty simple once you keep the focal bead in place. You need to double-string your beading thread, fix the focal bead in the middle, decide on the half you'd like to bead first and attach a beading needle to each thread. Then simply string one bead on each needle and cross the needles within the third. Rinse and Repeat. Adjust and replace beads at will. 

The focal bead on Shinigami is a cross, and I chose tiger eye hearts and moons as accent beads on one side, frosted rock crystal beads on the other. 

The custom-made necklace should have the same basic design, but with an oval focal stone and letters as accent beads.


Custom-made tiger eye necklace
with initial letters
 
After re-ordering a sufficient supply of the cubes and round tiger eye beads, I chose an oval, double-drilled cabochon as focal bead, with a very nice chatoyance. That request was easily fixed. The letters, though, were trickier. The customer wanted the initial letters of her children's names, but all options for ready-made pendants available on various internet sites were rejected. So, I decided to break in my first order of ArtClay, which I've had for a while but hadn't had the need to actually use so far. 


Shaping the C was easy. No edges, no built-in fracture points in the design, simple. Flattened the ends a bit, made the hole in the top curve, set it to dry. 


The J on the other side was a real trouble child. First version was hard to shape due to the clay drying out too quickly, and it broke, as I almost expected, after drying at the horizontal-vertical-junction. When making the second version, I flattened the whole horizontal part and used disposable gloves to avoid pre-maturely drying out the clay with my skin. This tactic worked lots better, and both letters survived the burning just fine. Polish, attach a small bail, finished. :)

The necklace was finished with three silver beads on each side and a sterling silver filigree lobster clasp.
To my relief (I'm always skitterish when trying out a new technique or material on a custom order), the necklace was recieved with much enthusiasm. 

If you'd like a similar custom-made necklace with the initials of your loved ones, feel free to contact me, here or through the message functions in my shops. Of course, I can also do other stones/colours.


> PASS MICH AN!

Heute möchte ich euch eine Spezialanfertigung zeigen, die durch eine meiner Ketten angeregt wurde.

Shinigami - Tigerauge-Choker

Links ist die Originalkette Shinigami, ein Choker aus digaonal gebohrten Tigerauge-Würfeln und facettierten runden Tigerauge-Perlen. Der Choker ist in der Kreuzstich-Technik 'gewebt', was eigentlich ganz einfach geht, wenn man erst mal das Mittelelement fixiert hat. Einfach die Perlenschnur doppelt nehmen, das zentrale Fokuselement in der Mitte fixieren, sich entscheiden welche Seite man zuerst machen möchte, und auf jedes Ende der beiden Perlenschnüre dieser Seite eine Perlnadel auffädeln. Je ein Perlchen auf jede Perlenschnur aufziehen, die Perlnadeln im dritten kreuzen, fertig. Perlenauffädelvorgang wiederholen, bis man die gewünschte Länge der einen Seite erreicht hat, und auf der anderen genauso machen. Außerdem kann man nach Lust und Laune die Perlen austauschen und anpassen. :)

Das Fokuselement bei Shinigami ist ein Kreuz, und als Akzente habe ich Herzen und Monde aus Tigerauge für die untere Seite, gefrostete Perlen aus Bergkristlall für die andere gewählt.

Die Kette nach Kundenwunsch sollte das gleiche Grunddesign haben, allerdings mit einem ovalen Fokuselement und zwei silbernen Buchstaben als Akzenten.


Custom-made tiger eye necklace
with initial letters
 
Nachdem ich erst mal die passende Menge an Würfeln und facettierten Perlen
 nachbestellt hatte, um mit dem Kundenauftrag anfangen zu können, habe ich ein ovales Cabochon mit einer sehr schönen Maserung als Fokuselement ausgewählt. Der Teil der Personalisierungswünsche war einfach. Die Buchstaben waren schwieriger. Die Kundin wollte die Anfangsbuchstaben ihrer Kinder, J und C, und die im Netz erhältlichen vorgeschlagenen Versionen wurden abgelehnt. Deswegen entschied ich mich, die Buchstaben mit meiner ersten Bestellung von ArtClay zu versuchen. Ich hatte den Clay schon eine Weile, aber noch keine Gelegenheit, ihn auszuprobieren.

Das C war echt einfach. Keine Ecken, keine vordefinierten Bruchstellen im Design, problemlos. Die beiden Enden habe ich etwas abgeflacht, das Loch für den Aufhänger in den oberen Bogen reingemacht und es zum Trocknen gelegt.

Das J dagegen war ein echtes Problemkind. Es war schwierig zu formen, da der ArtClay während des Vorgangs bereits austrocknete, und beim Trocknen ist es, quasi wie erwartet, an der Horizontal-Vertikalen Verbindung gebrochen. Beim zweiten Versuch habe ich die ganze horizontale Partie abgeflacht und mit Einmalhandschuhen gearbeitet, um zu verhidern, dass der Lehm durch meine Haut ausgetrocknet wird. Diese Taktik hat auch um Längen besser funktioniert, und beide Buchstaben haben das Brennen überlebt. Polieren, einen kleinen Aufhänger anbringen, und fertig sind 99% Sterlingsilber-Anhänger.

Den Abschluss der Kette bilden drei silberne Perlen auf jeder Seite, und eine ornamental verzierter Karabiner aus Sterlingsilber.
Glücklicherweise wurde die Kette mit viel Enthusiasmus in Empfang genommen (ich bin immer etwas nervös, wenn ich Techniken in einem Kundenauftrag ausprobiere, die ich vorher noch nie angewendet habe).

Wenn ihr eine ähnliche Kette mit den Initialen eurer Liebsten möchtet, schreibt mich einfach an, hier oder mit den Kontaktfunktionen meiner Shops. Natürlich geht dieses Design auch mit anderen Steinen/Farben. 


Tuesday 14 April 2015

> PROMOTION TIME


Mohn - Misfit
Mohn - Misfit, Water Colour


G'd afternoon ladies and gentlemen, 
First act of Business: Promotion of a fellow artist! :)

Ruth Trinczek is a talented painter and lives near Frankfurt, so there are more than enough reasons to promote her, if you ask me. ;)

In case you're impatient and don't want to read through all the praise I've spouted, here's the link to her page. 

For those who are in need of some quality prose, please refer to the page Featured Pages From Fellow Artists And Artisans. ;)


> ZEIT FÜR WERBUNG

Guten Nachmittag, meine Damen und Herren,
erste Amtshandlung: Werbung für eine tolle Künstlerin machen! :)

Ruth Trinczek lebt in der Nähe von Frankfurt im Taunus und ist eine hervorragende Malerin. Mehr als genug Gründe, für sie die Werbetrommel zu rühren, wenn du mich fragst. :)

Falls du ungeduldig bist und dich nicht erst durch die ganze Lobhudelei durchlesen möchtest, hier ist der Link zu ihrer Seite.

Für diejenigen, die unbedingt etwas Qualitätsliteratur brauchen, schaut mal auf die Seite Featured Pages From Fellow Artists And Artisans. ;)

Monday 13 April 2015

> WELCOME TO DREAMPATHS

I'm so glad you found your way here, and I hope you'll stay long and return often. :)

This is where you'll get insight into the daily life, problems and moments of bliss of a (nearly) full-time working mom exploring her second-most loved passion, designing and creating jewelry.

At some point in the future, I hope to earn my daily bread with my small business. However, I fear this is still a looooooong way out. 
Until then, I'd be honoured if you'd stay with me, and dive into the magical world of hunting down colourful gemstones, puzzling about wire gauges and jump ring sizes, learning how to handle new tools and figuring out how to do all those cool techniques like soldering, burning art clay or enamelling with a hand-held torch ... and how to acquire adequate and affordable supplies while living in a country that's neither USA nor UK.  

This blog still needs to undergo a proper set-up, but I'm quite positive the first exciting posts are not far away, so better save the blog to your favourites to avoid losing the url. ;)

In case you'd like to browse my goods in the meantime (and of course you do ;)), dreampaths is both on Etsy and on DaWanda, and you'll find the link of your choice in the menue on the right-hand side. 


Spring's Return - Necklace Keshi Pearls and Quartz, Cat's Eye gemstone, green gold jewelry, pearl jewelry, multistrand necklace, statement
Spring's Return - Keshi Pearls, Quartz and Copper


> WILKOMMEN BEI DREAMPATHS

Ich freue mich sehr, dass ihr den Weg hierher gefunden habt, und hoffe, dass ihr lange bleibt und oft wiederkommt. :)

Hier bekommt ihr Einblicke in das tägliche Leben, die Probleme und die Glücksmomente einer (fast) Vollzeit arbeitenden Mama, die nebenbei ihrer zweitliebsten Leidenschaft nachgeht, der Schmuckherstellung.

Irgendwann, in ferner Zukunft, hoffe ich, dass ich mit meinem Geschäft mein tägliches Brot verdienen kann. Allerdings fürchte ich fast, dass es bis dahin noch recht lange dauern wird. 
Bis es soweit ist, würde ich mich freuen, wenn ihr mich einen Teil des Weges begleitet und euch in eine magische Welt entführen lasst, voller bunter Edelsteine, Jump Rings und Schmuckdraht in verschiedenen Stärken und Farben, neuer Werkzeuge, mit denen man sich anfreunden muss und all den coolen Techniken wie Löten, das Brennen von ArtClay oder dem Emaillieren mit einem Handbrenner (die etwas stärkere Version einer Creme Brulée-Fackel ;)) ... und dem Problem, adäquates und bezahlbares Material zu beschaffen, wenn man nicht in einem Land wie den US oder der UK lebt. 

Dieser Blog muss erst noch fertig eingerichtet werden, aber die ersten aufregenden Posts sind sicher nicht weit entfernt, deswegen legt ihn besser gleich in eure Favoriten, damit ihr nicht aus Versehen die Adresse verliert. ;)

Falls ihr zwischenzeitlich schon mal ein paar meiner Stücke entdecken möchtet (und natürlich tut ihr das ;)), dreampaths ist sowohl bei DaWanda als auch auf Etsy vertreten. Ihr findet den Link eurer Wahl im Menü auf der rechten Seite.